前のページはこちら
ストレージに画像をアップする為、image_pickerを利用してスマホ内の画像を取得するように改変します。
Contents
今回Webは対象外です
今回はモバイル向けのプラグインを利用するため、実機確認がWebが対象外になります。ただし画像を取得した後の知識はWebにも応用できると思います。
image_pickerの準備
プロジェクトにインストール
下記のコマンドをコンソールで実行してプロジェクトにインストールします。
flutter pub add image_pickeriOS/androidの設定
iOSとandroid、それぞれに設定が必要です。今回こちらのサイトも参考にさせていただきました。
尚、WEBでは動きませんので、WEBの場合は別処理にする必要があります。
(iOS対応)info.plist に追記
カメラやフォトライブラリを使う時に必要です。
ios/Runner/Info.plistを編集します。<dict></dict>内に定義しますが、今回は一番下に追加しました。
	<key>NSPhotoLibraryUsageDescription</key>
	<string>This app requires to access your photo library</string>
	<key>NSCameraUsageDescription</key>
	<string>This app requires to add file to your camera</string>
	<key>NSMicrophoneUsageDescription</key>
	<string>This app requires to add file to your photo library your microphone</string>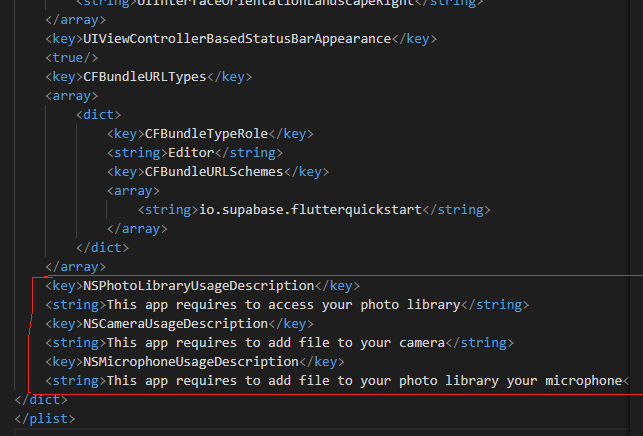
(Android対応)
今回は割愛しますが、使用しているAPIレベルなどによっては変更しないとエラーが出る事があるようです。ネット上の記事は多いのでエラー文面に従い、適宜変更をお願いします。
コード変更
久しぶりにauth_page_view.dartを変更します。下記をコピペしてください。
import 'dart:io';
import 'package:flutter/material.dart';
import 'package:image_picker/image_picker.dart';
import 'package:supabase_flutter/supabase_flutter.dart';
import 'supabase_repository.dart';

class AuthPageView extends StatefulWidget {
  const AuthPageView({Key? key}) : super(key: key);

  @override
  _AuthPageViewState createState() => _AuthPageViewState();
}

class _AuthPageViewState extends State<AuthPageView> {
  File? _image;
  final picker = ImagePicker();

  TextEditingController _emailController = TextEditingController();
  TextEditingController _passController = TextEditingController();
  TextEditingController _nameController = TextEditingController();

  //Supabase.instance.client.auth.currentUser!.email;
  Widget build(BuildContext context) {
    return ListView(
      padding: const EdgeInsets.symmetric(vertical: 18, horizontal: 12),
      children: [
        const SizedBox(height: 18),
        Text('${Supabase.instance.client.auth.currentUser?.email}'),
        const SizedBox(height: 18),
        TextFormField(
          controller: _emailController,
          decoration: const InputDecoration(labelText: 'Email'),
        ),
        TextFormField(
          controller: _passController,
          decoration: const InputDecoration(labelText: 'Pass'),
        ),
        const SizedBox(height: 18),
        ElevatedButton(
          onPressed: () async {
            var _res = await SupabaseRepository.LogIn(
              email: _emailController.text,
              pass: _passController.text,
            );
            print('ログイン終了');
            setState(() {});
          },
          child: Text('ログイン'),
        ),
        const SizedBox(height: 18),
        ElevatedButton(
          onPressed: () async {
            var _res = await SupabaseRepository.SignUp(
              email: _emailController.text,
              pass: _passController.text,
            );
            print('アカウント作成終了');
          },
          child: Text('アカウント作成'),
        ),
        const SizedBox(height: 18),
        ElevatedButton(
          onPressed: () async {
            var _res = await SupabaseRepository.LogOut();
            print('ログアウト');
            setState(() {});
          },
          child: Text('ログアウト'),
        ),
        const SizedBox(height: 30),
        TextFormField(
          controller: _nameController,
          decoration:
              const InputDecoration(labelText: '変更する名前(ログイン後)もしくは名前検索文字列'),
        ),
        const SizedBox(height: 18),
        ElevatedButton(
          onPressed: () async {
            var _res = await SupabaseRepository.DBUpdate(
              name: _nameController.text,
            );
            print('作成終了');
          },
          child: Text('名前変更'),
        ),
        const SizedBox(height: 30),
        ElevatedButton(
          onPressed: () async {
            var _res = await SupabaseRepository.DBDataGet(
              findString: _nameController.text,
            );
            print('データゲット完了');
            setState(() {});
          },
          child: Text('データゲット'),
        ),
        Column(
            children: SupabaseRepository.getUserDatas
                .map((GetUserData item) => Row(
                      children: [
                        Text(item.name),
                        Text(':'),
                        Text(item.update.toString()),
                      ],
                    ))
                .toList()),
        const SizedBox(height: 30),
        ElevatedButton(
          onPressed: () async {
            final pickedFile =
                await picker.pickImage(source: ImageSource.gallery);
            setState(() {
              if (pickedFile != null) {
                _image = File(pickedFile.path);
              }
            });
          },
          child: Text('画像ゲット'),
        ),
        _image == null ? Text('No image selected.') : Image.file(_image!),
      ],
    );
  }
}
コード解説
File型とImagePickerオブジェクト
まずは下記がimage_pickerに必要なインポート群となります。
import 'dart:io';
import 'package:image_picker/image_picker.dart';
_AuthPageViewStateの先頭で下記を定義しています。
  File? _image;
  final picker = ImagePicker();
File型はdartのファイルシステムで、このオブジェクトがファイルそのものを扱います。取得した『画像ファイル』そのものが扱われる感じです。また、ImagePickerのオブジェクトとしてpickerを生成しています。
画像取得部分
        ElevatedButton(
          onPressed: () async {
            final pickedFile =
                await picker.pickImage(source: ImageSource.gallery);
            setState(() {
              if (pickedFile != null) {
                _image = File(pickedFile.path);
              }
            });
          },
          child: Text('画像ゲット'),
        ),
新しくボタンを定義して、画像取得の処理も入れました。画像取得をしているコードは次の1行です
final pickedFile = await picker.pickImage(source: ImageSource.gallery);pickerのpickImageメソッドで画像取得します。awaitを付けて処理を待ち、pickedFileに入れています。
※ポイント※
source: ImageSource.galleryでスマホの画像ギャラリーからの取得になります。
source: ImageSource.cameraにするとカメラからの画像が取得できます。
最後に、pickedFileはXFile型のファイルなので、下記コードでFile型として_imageに入れています。
//取得したpickedFileのパスを引数にFile型を生成し、_imageに代入
_image = File(pickedFile.path);
尚、この一行はSetStateで囲われており更新が走ります。
格納された画像の表示
その直下では三項演算子で、_imageがある場合は画像を表示するしています。
- _imageがnillなら「Text(‘No image selected.’)」を表示
- そうでない場合はImage.fileで画像を表示
_image == null ? Text('No image selected.') : Image.file(_image!),三項演算子はなんとなく苦手なのですが、Flutterのこの瞬間は便利だなぁと感じます。
実行
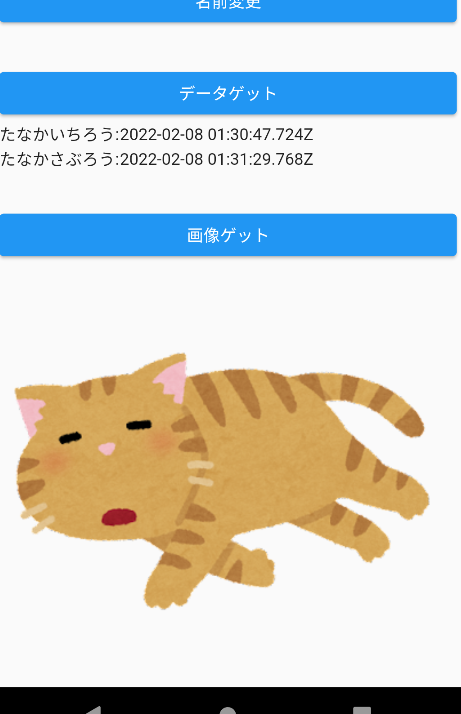
実行すると、下の方に「画像ゲット」ボタンがあるのでそれを押すとギャラリーが開きます(最初は確認が出るかも知れません)
ギャラリーが開いたので端末内の好きなファイルを選択します。自分はアンドロイドエミュレーターで画像が無かったので、ブラウザでネットから適当に画像をダウンロードしました。
選択すると、下の方に選択した画像が表示されます。これで画像取得が出来る事を確認しました。
次のページはこちら